产品分类
产品分类
基于HX711 称重传感器的张力秤制作方案
 28
28
 拍明
拍明
原标题:基于HX711 称重传感器的张力秤制作方案
步骤1:安装称重传感器
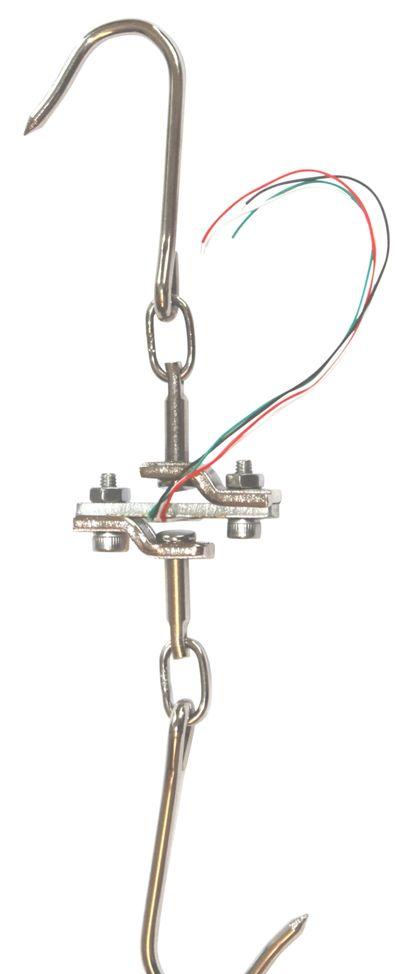


首先,我们要安装称重传感器。您的坐骑将是唯一的,但是这里是您需要遵循的准则:
1。钢制称重传感器是一块板,中间装有应变片。称重传感器通过感应称重传感器弯曲多少来测量力。
2。支架通过称重传感器梁两端的孔连接。托架的形状使拉力施加在测力传感器梁的中心。由于其形状和固定位置,拉动托架时称重传感器梁会弯曲。
3。将括号钩到要测量的内容上。为此,最好使用可以自由移动的东西(例如链,钩,结实的绳子或扎带)。您希望称重传感器和托架组件能够使其自身在称重方向上居中,以便测量准确。
步骤2:为称重传感器和HX711接线

请参阅接线图,以了解如何连接称重传感器,HX711和Arduino。
在所示的行李箱式称重传感器上,有多个应变仪已经连接到惠斯通电桥。您所需要做的就是以正确的方向将导线连接到HX711板上。
步骤3:将HX711库添加到ArduinoIDE
HX711库位于此处:https://github.com/bogde/HX711
有关如何将库添加到ArduinoIDE的说明,请参见Arduino网站上的此链接:https://www。arduino.cc/zh-CN/Guide/Libraries
步骤4:校准并称重!

Sparkfun有出色的Arduino程序可以运行规模。最新版本可以在GitHub上找到,并在下面转载:https://github.com/sparkfun/HX711-Load-Cell-Amplifier
第一步是确定秤的校准因子。为此,请运行以下代码
/*
ExampleusingtheSparkFunHX711breakoutboardwithascale
By:NathanSeidle
SparkFunElectronics
Date:November19th,2014
License:Thiscodeispublicdomainbutyoubuymeabeerifyouusethisandwemeetsomeday(Beerwarelicense)。
Thisisthecalibrationsketch.Useittodeterminethecalibration_factorthatthemainexampleuses.Italso
outputsthezero_factorusefulforprojectsthathaveapermanentmassonthescaleinbetweenpowercycles.
SetupyourscaleandstartthesketchWITHOUTaweightonthescale
Oncereadingsaredisplayedplacetheweightonthescale
Press+/-ora/ztoadjustthecalibration_factoruntiltheoutputreadingsmatchtheknownweight
Usethiscalibration_factorontheexamplesketch
Thisexampleassumespounds(lbs)。Ifyoupreferkilograms,changetheSerial.print(“lbs”);linetokg.The
calibrationfactorwillbesignificantlydifferentbutitwillbelinearlyrelatedtolbs(1lbs=0.453592kg)。
Yourcalibrationfactormaybeverypositiveorverynegative.Italldependsonthesetupofyourscalesystem
andthedirectionthesensorsdeflectfromzerostate
Thisexamplecodeusesbogde‘sexcellentlibrary:“https://github.com/bogde/HX711”
bogde’slibraryisreleasedunderaGNUGENERALPUBLICLICENSE
Arduinopin2-》HX711CLK
3-》DOUT
5V-》VCC
GND-》GND
MostanypinontheArduinoUnowillbecompatiblewithDOUT/CLK.
TheHX711boardcanbepoweredfrom2.7Vto5VsotheArduino5Vpowershouldbefine.
*/
#include“HX711.h”
#defineDOUT3
#defineCLK2
HX711scale;
floatcalibration_factor=-7050;//-7050workedformy440lbmaxscalesetup
voidsetup(){
Serial.begin(9600);
Serial.println(“HX711calibrationsketch”);
Serial.println(“Removeallweightfromscale”);
Serial.println(“Afterreadingsbegin,placeknownweightonscale”);
Serial.println(“Press+oratoincreasecalibrationfactor”);
Serial.println(“Press-orztodecreasecalibrationfactor”);
scale.begin(DOUT,CLK);
scale.set_scale();
scale.tare();//Resetthescaleto0
longzero_factor=scale.read_average();//Getabaselinereading
Serial.print(“Zerofactor:”);//Thiscanbeusedtoremovetheneedtotarethescale.Usefulinpermanentscaleprojects.
Serial.println(zero_factor);
}
voidloop(){
scale.set_scale(calibration_factor);//Adjusttothiscalibrationfactor
Serial.print(“Reading:”);
Serial.print(scale.get_units(),1);
Serial.print(“lbs”);//Changethistokgandre-adjustthecalibrationfactorifyoufollowSIunitslikeasaneperson
Serial.print(“calibration_factor:”);
Serial.print(calibration_factor);
Serial.println();
if(Serial.available())
{
chartemp=Serial.read();
if(temp==‘+’||temp==‘a’)
calibration_factor+=10;
elseif(temp==‘-’||temp==‘z’)
calibration_factor-=10;
}
}
在校准秤后,您可以运行以下示例程序,然后将其用于自己的目的:
/*
ExampleusingtheSparkFunHX711breakoutboardwithascale
By:NathanSeidle
SparkFunElectronics
Date:November19th,2014
License:Thiscodeispublicdomainbutyoubuymeabeerifyouusethisandwemeetsomeday(Beerwarelicense)。
Thisexampledemonstratesbasicscaleoutput.Seethecalibrationsketchtogetthecalibration_factorforyour
specificloadcellsetup.
Thisexamplecodeusesbogde‘sexcellentlibrary:“https://github.com/bogde/HX711”
bogde’slibraryisreleasedunderaGNUGENERALPUBLICLICENSE
TheHX711doesonethingwell:readloadcells.Thebreakoutboardiscompatiblewithanywheat-stonebridge
basedloadcellwhichshouldallowausertomeasureeverythingfromafewgramstotensoftons.
Arduinopin2-》HX711CLK
3-》DAT
5V-》VCC
GND-》GND
TheHX711boardcanbepoweredfrom2.7Vto5VsotheArduino5Vpowershouldbefine.
*/
#include“HX711.h”
#definecalibration_factor-7050.0//ThisvalueisobtainedusingtheSparkFun_HX711_Calibrationsketch
#defineDOUT3
#defineCLK2
HX711scale;
voidsetup(){
Serial.begin(9600);
Serial.println(“HX711scaledemo”);
scale.begin(DOUT,CLK);
scale.set_scale(calibration_factor);//ThisvalueisobtainedbyusingtheSparkFun_HX711_Calibrationsketch
scale.tare();//Assumingthereisnoweightonthescaleatstartup,resetthescaleto0
Serial.println(“Readings:”);
}
voidloop(){
Serial.print(“Reading:”);
Serial.print(scale.get_units(),1);//scale.get_units()returnsafloat
Serial.print(“lbs”);//Youcanchangethistokgbutyou‘llneedtorefactorthecalibration_factor
Serial.println();
}
责任编辑:David
【免责声明】
1、本文内容、数据、图表等来源于网络引用或其他公开资料,版权归属原作者、原发表出处。若版权所有方对本文的引用持有异议,请联系拍明芯城(marketing@iczoom.com),本方将及时处理。
2、本文的引用仅供读者交流学习使用,不涉及商业目的。
3、本文内容仅代表作者观点,拍明芯城不对内容的准确性、可靠性或完整性提供明示或暗示的保证。读者阅读本文后做出的决定或行为,是基于自主意愿和独立判断做出的,请读者明确相关结果。
4、如需转载本方拥有版权的文章,请联系拍明芯城(marketing@iczoom.com)注明“转载原因”。未经允许私自转载拍明芯城将保留追究其法律责任的权利。
拍明芯城拥有对此声明的最终解释权。
相关资讯
:
基于MC33771主控芯片的新能源锂电池管理系统解决方案
AMIC110 32位Sitara ARM MCU开发方案
基于AMIC110多协议可编程工业通信处理器的32位Sitara ARM MCU开发方案
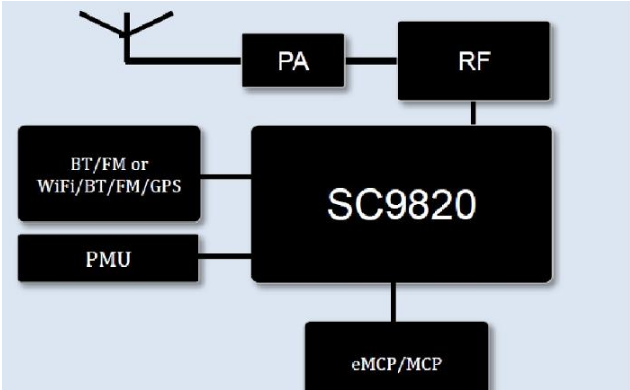
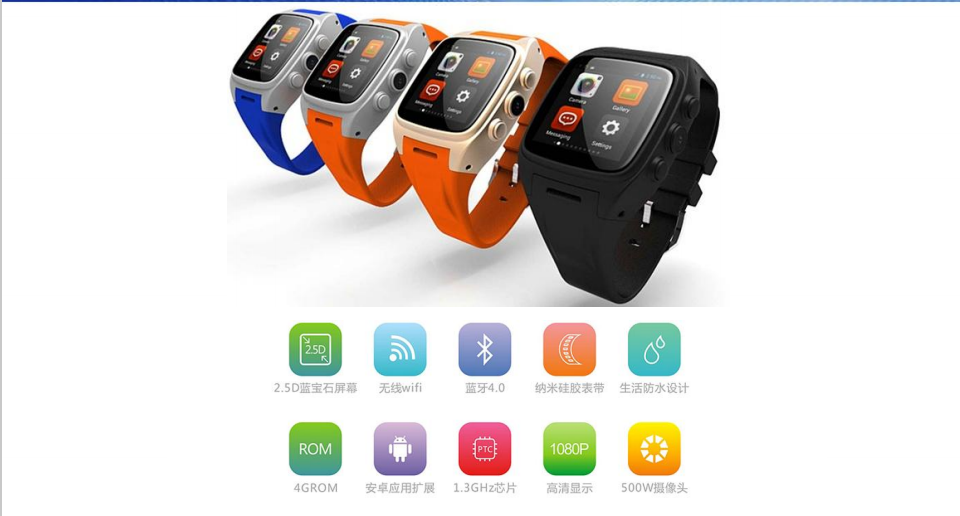
基于展讯SC9820超低成本LTE芯片平台的儿童智能手表解决方案
基于TI公司的AM437x双照相机参考设计
基于MTK6580芯片的W2智能手表解决方案


 2012- 2022 拍明芯城ICZOOM.com 版权所有 客服热线:400-693-8369 (9:00-18:00)